EXPLORING ACCESS
| Site: | UNITE LMS |
| Course: | COMPUTER BASIC SKILLS |
| Book: | EXPLORING ACCESS |
| Printed by: | Guest user |
| Date: | Thursday, 23 July 2026, 12:24 AM |
Table of contents
- 1. WORKING WITH ACCESS
- 1.1. STARTING ACCESS
- 1.2. OPENING AN EXISTING DATABASE
- 1.3. FAMILIARISING WITH THE RIBBON
- 1.4. USING THE CONTEXTUAL TABS
- 1.5. USING THE QUICK ACCESS TOOLBAR
- 1.6. UNDERSTANDING DATABASE OBJECTS
- 1.7. USING THE NAVIGATION PANE
- 1.8. OPENING A DATABASE OBJECT
- 1.9. DELETING A DATABASE OBJECT
- 1.10. USING TABBED DOCUMENTS
- 1.11. CLOSING A TABBED DOCUMENT
- 1.12. CLOSING ALL TABBED DOCUMENTS
- 1.13. SWITCHING BETWEEN THE VIEW MODES
- 1.14. USING THE OPTIONS DIALOG BOX
- 1.15. CLOSING A DATABASE
- 1.16. CREATING AND SAVING A NEW DATABASE
- 1.17. USING HELP
- 1.18. EXITING ACCESS
1. WORKING WITH ACCESS
A database is any collection of related data organized for fast search and retrieval.
For example, a telephone book is a non-computerized database of information. It is
organized in alphabetical order and includes information such as names,
addresses, and telephone numbers. Other examples of non-computerized
databases include address books and inventory lists
Data is raw, unorganized facts and details. Examples of data that could be stored
in a database are:
A student’s test score
- • An employee’s ID
- • A vendor’s email address.
Information is the processed output of data. It provides context for data. Examples are:
- • Average test score per subject chart
- • Mailing list sorted alphabetically and organized by location.
In Microsoft Access 2010, the database information is stored in data tables.
Every data table has a structure that provides for the collection, organization,
storage, and retrieval of data. These tables of information are contained in a
database file. Each database file can have numerous data tables.
Some of the common uses of large-scale databases are:
Airline booking systems:
These systems maintain a database of all the seats on all the available
flights, allowing passengers to be quickly booked onto flights to their
destination.
Government records: Governments all over the world rely on multiple large databases in order to function. Tax records, criminal records, and social security all require sophisticated database systems.
Bank account records: Banks require extremely reliable databases in order to keep track of all their customer account and log transactions.
Hospital patient details:
Medical records are stored in a database system. This system should allow
your medical history to be instantly available wherever you require
treatment.
Access is a tool that you can use to quickly and easily develop relational database applications that help you manage information. You can create a database to help you keep track of just about any kind of information, such as inventory, professional contacts, or business processes. In fact, Access comes with templates that you can use right away to track a variety of information, making things easy even for a beginner.
Professional databases are designed and created by database specialists. These are highly skilled database professionals with an in-depth knowledge of exactly how the database works, including its overall function and details programming. Database specialists design and create databases to meet the organization’s needs for present and future use.
For example, a database specialist analyses the data processing and information needs of a computer training center and designs a database that allows the storing of students, trainers, and course details.
There are various roles that are assigned to maintain the database, such as:
1. Database administrator:
a) Controls access to different data for specific users.
b) Implements security measures to safeguard the organization’s database.
c) Has overall responsibility for the maintenance and repair of an organization’s database.
d) Recovers the database after a crash or major errors.
2. Database user:
a) Enters, updates, and retrieves data/information.
b) Granted access rights as needed for basic data entry and search.
For example, a database administrator assigns various access permission to data entry personnel, course administrators, and managers for the database in the computer training center. Data entry personnel may only enter and edit student records but cannot access trainers or course details. The database administrator may incorporate password protection for sensitive data in the database.
A database user in the computer training center can access the database based
on the access level granted. Data entry personnel can only enter/edit/search/print records of students but cannot access trainer details. Managers may have a higher
level of access such as can view/editing/search/printing records and reports of students,
trainers, and courses.
1.1. STARTING ACCESS
Access databases can help you store and track just about any kind of information,
such as inventory, contacts, or business processes. You will learn how to create an
Access desktop database, add data to it, and then learn about the next steps towards
customizing and using your new database.
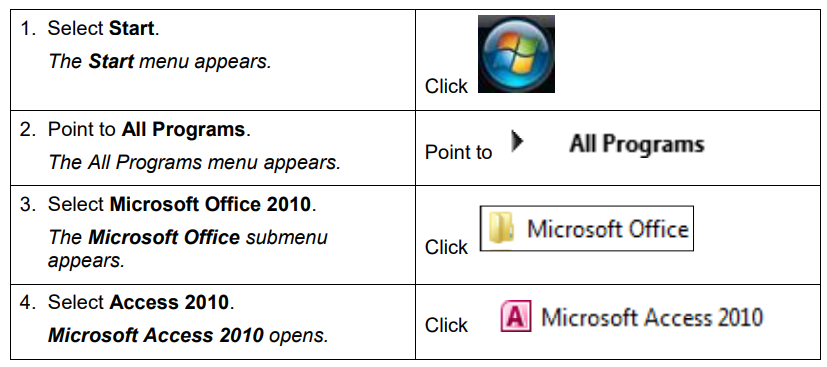
Steps
To start Microsoft Access 2010:
1.2. OPENING AN EXISTING DATABASE
Concepts
Databases residing on your computer or on a shared network drive can be opened
by starting Microsoft Access and then selecting Open command from the File
tab.
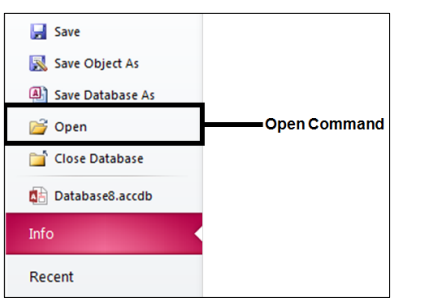
Steps
To open an existing database from a specific drive and folder location:

Tip: You can use the keyboard shortcut Ctrl+O to open a database project.
1.3. FAMILIARISING WITH THE RIBBON
The Ribbon is the long strip comprised of tabs with buttons across the top of the main window within the Access interface. Since Access 2007, Ribbon has replaced all the menus and toolbars that were found in Access 2003 and older versions. The Ribbon is designed in a way that aids you in quickly finding commands that help complete a task and contains almost all of the primary commands for working with access. You no longer have to search commands endlessly through many menus and sub-menus.
However, the File tab still exists, as does a single toolbar called the Quick Access
Toolbar. All the other commands are now found in the various tabs of the Ribbon
within the interface.
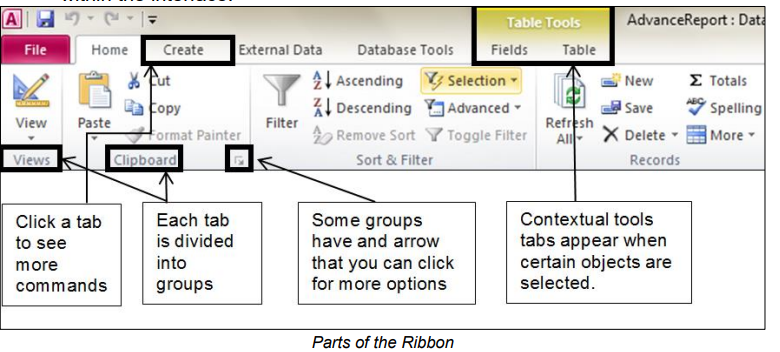
The Ribbon is designed to respond to your current task; however, you can choose to minimize the Ribbon if you find that it takes up too much screen space.
Click the arrow in the top-right corner of the Ribbon to minimize it. Click a tab to
make the Ribbon reappear. It will disappear again when not in use. To maximize
the Ribbon, click a tab, then click the pin icon in the lower-right corner. The
Ribbon will appear at all times.
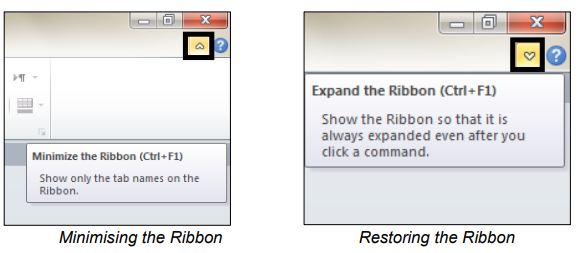
As an alternative, you can also double-click on any tab heading to minimize or
restore the Ribbon.
1.4. USING THE CONTEXTUAL TABS
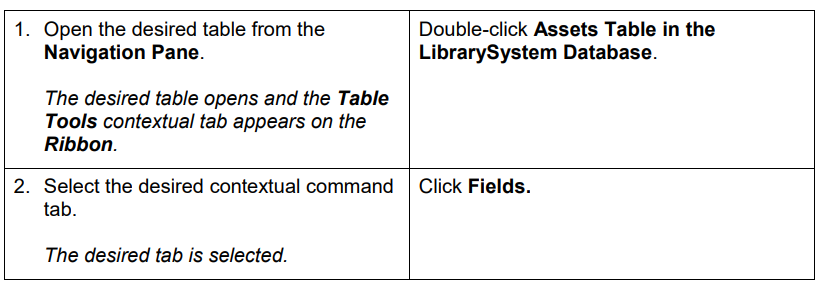
Contextual tabs appear on the Ribbon when an object requiring additional
functionality is selected. For example, selecting a table in Access will display
Table Tools contextual tabs on the Ribbon.

Steps
To use a contextual command tab:
1.5. USING THE QUICK ACCESS TOOLBAR
By default, the Save, Undo, and Repeat/Redo buttons appear on the Quick Access Toolbar. If you regularly use a few buttons that are scattered on various tabs of the Ribbon and you do not want to switch between tabs to access the buttons or crowd the Ribbon with a custom tab, you might want to add these frequently used buttons to the Quick Access Toolbar. They are then always visible in the upper-left corner of the program window.
Clicking the Customize Quick Access Toolbar button at the right end of the
Quick Access Toolbar displays a menu that lists commonly used commands.
Check marks appear to the left of commands currently available on the Quick
Access Toolbar. You can click these commands to remove them and click other
commands to add them.
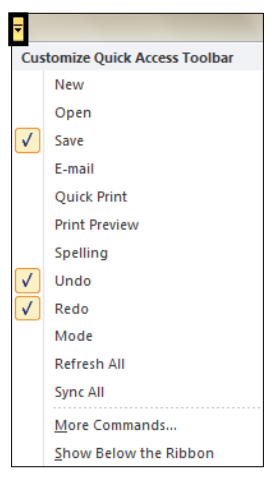
As you add buttons to the Quick Access Toolbar, it expands to accommodate
them. If you add too many buttons, some of them might not be visible, which
defeats the purpose of adding them. To resolve this problem, you can move the
Quick Access Toolbar below the ribbon by clicking the Customize Quick
Access Toolbar button, and then clicking Show below the Ribbon.
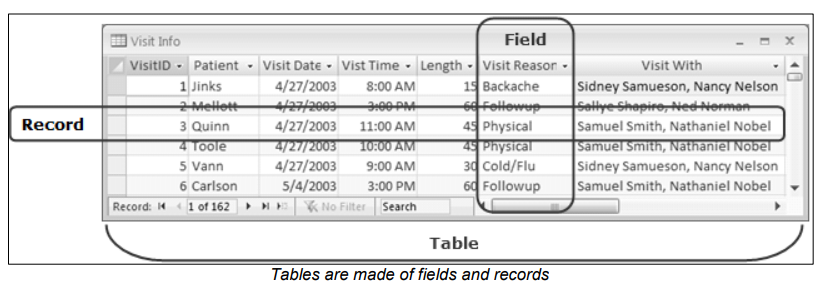
1.6. UNDERSTANDING DATABASE OBJECTS
An Access database can contain various types of database objects, including
tables, queries, forms, reports, macros, and modules. The following section briefly
introduces the four main database objects. All database objects can be accessed
from the Navigation Pane.
1. Tables:
The basic building block of any database is a table. A database table
is similar in appearance to a list or spreadsheet, in that the data is
stored in rows and columns.
A database can have many tables. A table should only contain
records related to a particular subject. When tables contain data
related to a single subject type, it is easier to search for and locate
data. For example, you may have a table called customers containing
information about your customers with a separate table called orders.
You can then link the tables by creating a relationship, connecting
each customer with their associated orders.
Queries:
Queries allow users to locate data from one or more tables according
to specific search criteria. The data you want to retrieve may be
stored in several tables, and a query allows you to view data from
several tables in a single datasheet. In addition, because you
generally do not want to see all the information at once, queries allow
you to select certain fields and add criteria to retrieve only specific
records.
The result of a query is called a record set or result set. You can view
the result set on the screen, print it, copy it to the clipboard, or use
the output of the query as the record source for a form or report
Forms:
Forms are commonly used as data entry screens. They are
user-friendly interfaces for working with data, and they often contain
elements and command buttons that make entering data and
performing various other tasks quick and easy.
Reports:
You use reports to print and summarise data. Each report is
formatted to present the information in the most readable way
possible. You can format any report to fit your requirements and you
can create custom reports as well.
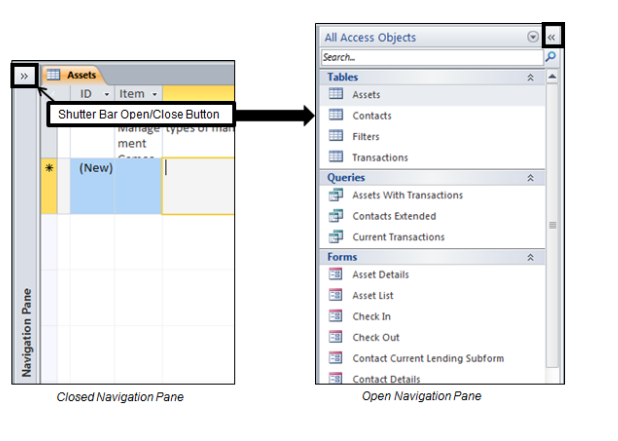
1.7. USING THE NAVIGATION PANE
Navigation Pane is located on the left side of the Access window and helps you to
work with database objects. Navigation Pane is organized by categories and
groups. You can customize the categories and groups of objects in the Navigation
Pane. You can select specific objects from the Navigation Pane.
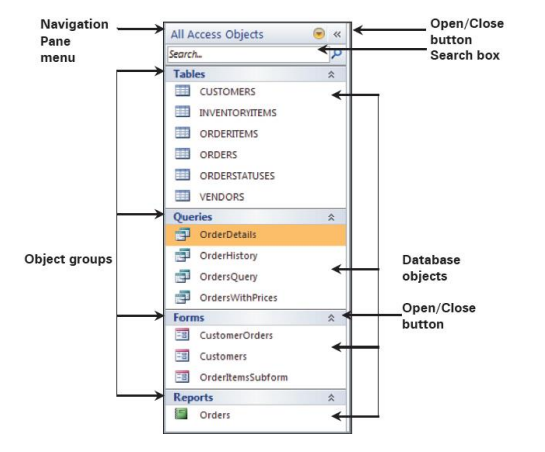
You can change the width of the Navigation Pane by positioning the pointer over
the right edge of the Navigation Pane. You can also hide or open the Navigation
Pane by clicking the Shutter Bar Open/Close button.
Steps
To use the Navigation Pane to select an object type:
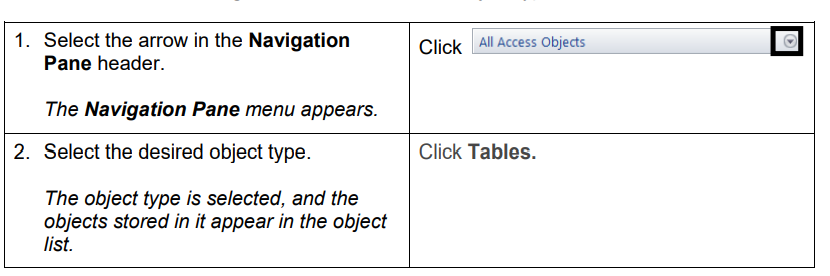
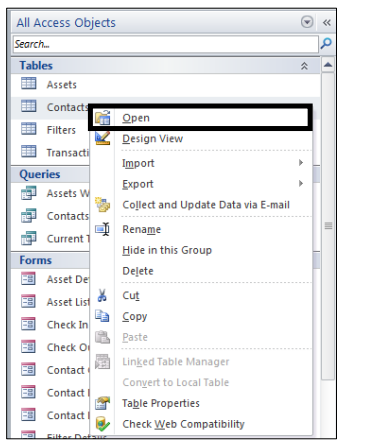
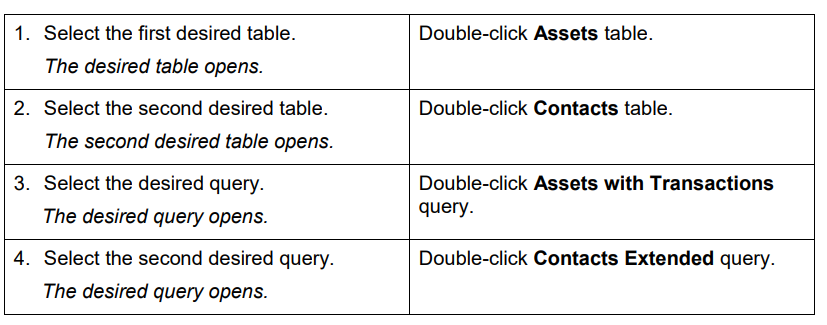
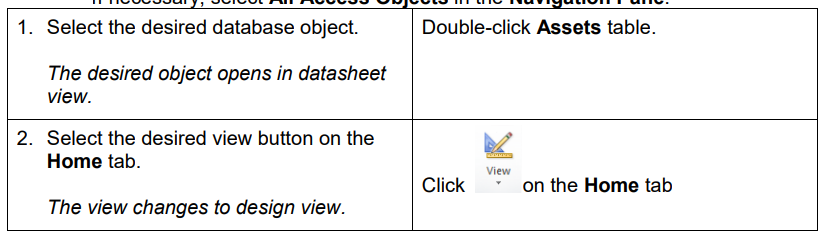
1.8. OPENING A DATABASE OBJECT
You can use any object in the Navigation Pane by double-clicking it. If you
right-click an object, you notice a shortcut menu that lets you do various actions,
such as opening an object in the design view.
Steps
To open a database object:
If necessary, display the Tables object list in the Navigation Pane
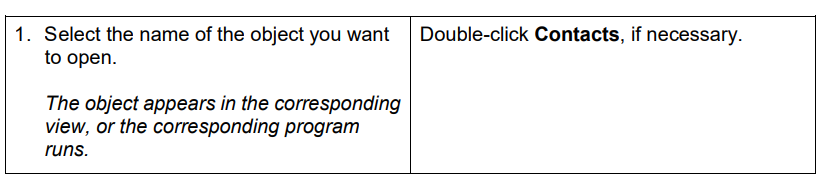
Click the Close button on the Contacts table window title bar to close the
Contacts table
1.9. DELETING A DATABASE OBJECT
You can delete any object (table, query, form, report) in the Navigation Pane by
selecting it and pressing the Delete key. You can also click the Delete button on
the Home tab. Click Yes for the prompt.
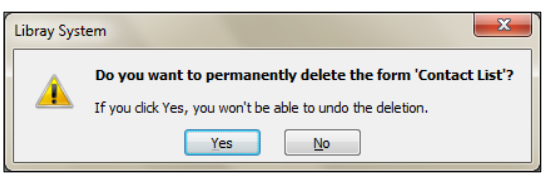
When you delete a table, you delete all the data in the table. You cannot undo the
delete operation.
Practice the Concept: Display the Forms object list. Select the Asset Details
form object, if necessary, and then double-click it to display the form in Form view.
Close the Asset Details form window. Delete the Asset Details form.
Display the Reports object list. Double-click the All Assets object to display it in
print preview mode. Close the All Assets report window without saving changes, if
prompted.
1.10. USING TABBED DOCUMENTS
Each object that you open in an Access database opens in a new tab. This will
allow you to quickly switch between each object. If needed, you can disable tabbed
documents by setting your Access options.
To view tabbed documents:
If necessary, select All Access Objects in the Navigation Pane
Notice that the tab title is displayed in bold type.
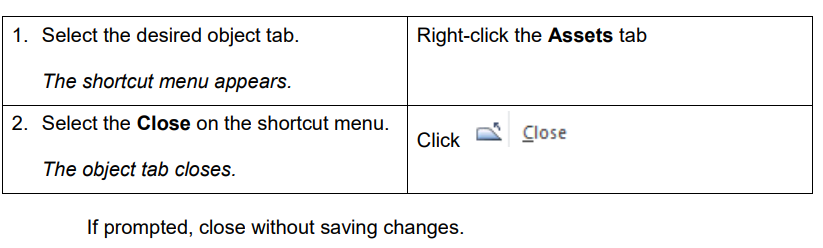
1.11. CLOSING A TABBED DOCUMENT
An opened tab can be closed by selecting Close from the shortcut menu displayed
on the active database object.
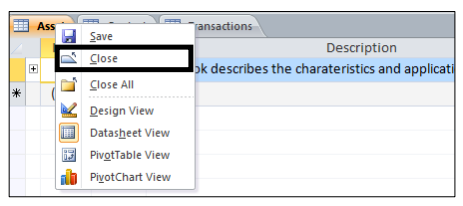
Steps
To close a tabbed document:
1.12. CLOSING ALL TABBED DOCUMENTS
All the opened tabs can be closed all the time by selecting Close All from the
shortcut menu displayed on the active database object.
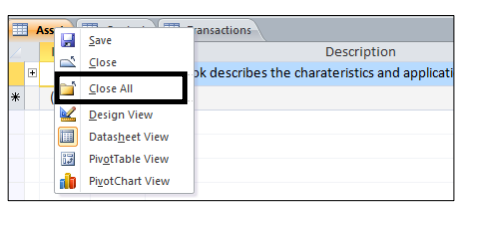
Steps
To close all tabbed documents:

Click No, if prompted to save the changes. Notice that all tabbed objects are
closed.
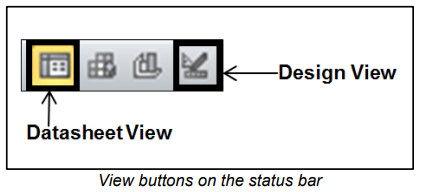
1.13. SWITCHING BETWEEN THE VIEW MODES
As you continue working with Access, you will find yourself switching between the Design view and the Datasheet view.
Click the View button on the Home tab to switch to the Design view of a table,
query, form, or report.

Click the View icon to return to Datasheet view (in tables and queries).

Steps
To switch between views:
If necessary, select All Access Objects in the Navigation Pane.

You can also use the status bar to switch between different views.
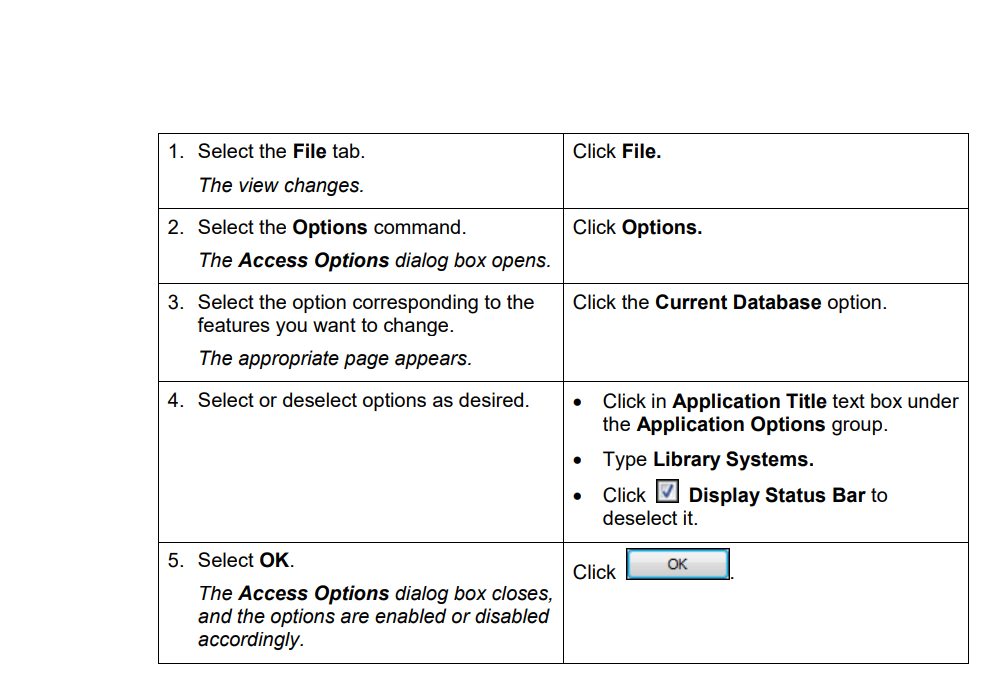
1.14. USING THE OPTIONS DIALOG BOX
Access allows you to configure several things on database start-up. For instance,
you can hide the Navigation Pane, launch a splash screen or a switchboard form,
set an Application Title, set an Application Icon, and several other things.
These settings can be set using the Access Options dialog box.
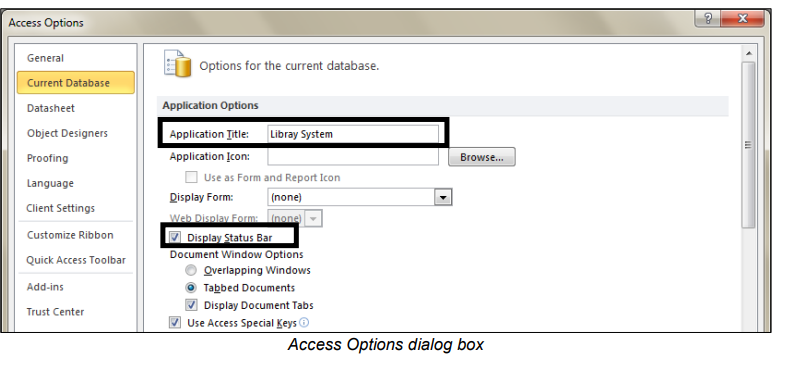
Steps
To use the Access Options dialog box:
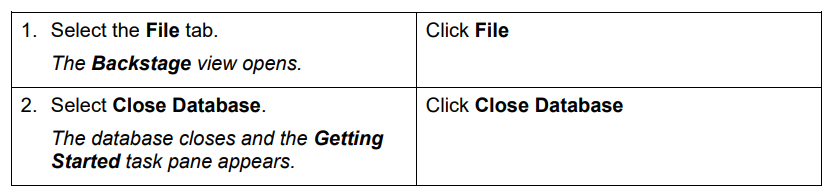
1.15. CLOSING A DATABASE
An opened database can be closed by selecting the Close command from the File
tab.
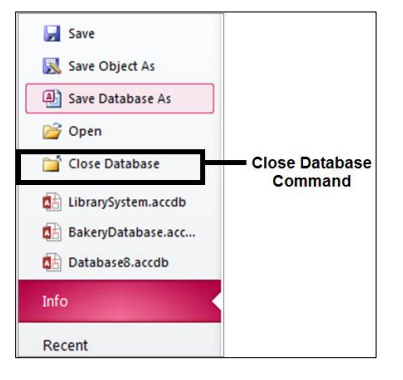
Steps
To close a database
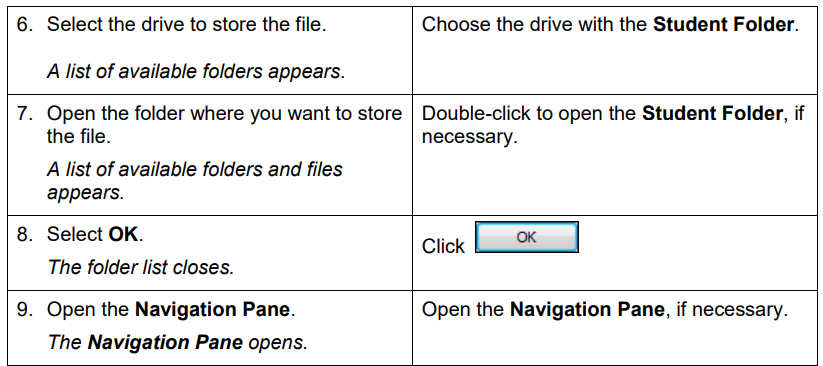
1.16. CREATING AND SAVING A NEW DATABASE
You can create a database by building your own tables, forms, reports, and other
database objects.
Steps
To create a new, blank database:

Click No, if prompted to save the changes. Notice that all tabbed objects are
closed.
1.17. USING HELP
You can use Access’s extensive Help facility when you need assistance on any
Access topic or task. You can search both Access Help online and offline sources
to provide assistance.
Steps
To access Help:
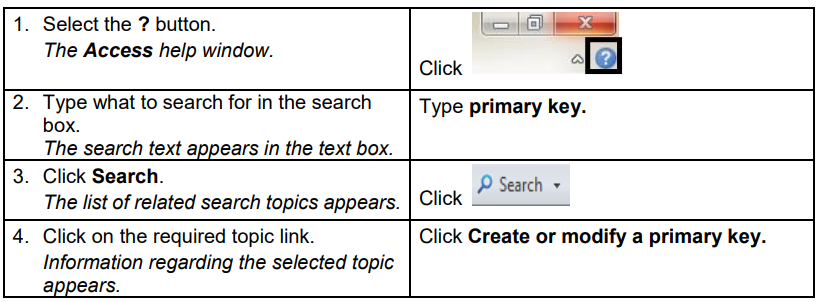
Close the Help window when done
Tip: You can access Help by hitting F1 on your keyboard
1.18. EXITING ACCESS
To exit Access, you need to close the Access application.
Steps
To exit Access:

Notice that the Access application has closed.